Healthy Chocolate Cream Pie Recipe
- The Inspiring Hummingbird

- Nov 17, 2021
- 4 min read
Hello Lovely!
How are you doing? I hope your day has been going well! In today's post, I will be sharing a healthy recipe for a Chocolate Cream Pie, that I created myself. I also will share a recipe for a healthy pie crust alternative! Please note that the recipe instructions are followed just as they are in the original recipe that I found. I have made notes where I edited the original pie crust recipe. I will add the original pie crust recipe ingredients at the very end of this post. But the main focus of this post in regard to the pie crust is my healthy alteration of it. As mentioned above, I created this pie crust recipe by editing a recipe I found on Google. I can't wait to share this with you and just in time for the holidays too! Without taking too much longer, let's get into the recipes!
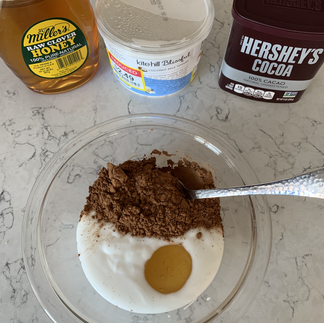
For the Chocolate Cream filling, you will need the following ingredients,
Ingredients:
2-4 Tbsp - Unsweetened 100% Cacao or Cocoa powder.
1 Cup - Coconut or plant-based yogurt of your choice that is low in sugar, or any yogurt you want.
3-4 tsp Honey - or your sweetener alternative of choice.
Directions:
Now, to make the filling, measure out your filling. I made mine in smaller-sized pie crusts, so be sure to measure accordingly. I used roughly 1/2 to 1 cup of yogurt.
Add yogurt, cocoa powder, and honey or sweetener of choice to a bowl.
Mix! It is best to fold in the cacao or cocoa powder. To make it easier, add your honey if you're using honey, or any liquid-alternative sweetener, into the yogurt first and give it a good mix. Then proceed to fold in your cocoa powder.
At this point, once mixed and combined well, we will leave it alone and then come back to it. Onto our pie crust(s) now!
For our Pie Crust, we will need the following ingredients.
Ingredients:
2 1/2 cups almond flour
1/2 cup butter Hard, not melted (you can substitute coconut oil here for the same amount. It will work just as well!)
1/4 tsp salt, sea salt works well if you don't want regular table salt
1/4 cup ice water, or less.
1/4 teaspoon Honey
To make our crust, we will do the following:
Directions:
Combine flour, butter, sugar (in our case, honey or any sweetener alternative), and salt in a large bowl.
Using a pastry cutter, start working the butter into the dry ingredients until it looks like crumbles. (You can also use 2 butter knives & cross them through the ingredients to combine.) Note: Using your hands here works just as well and enables you to get connected with your dough.
Once you have reached a crumbly texture add the water.
Work it together with your hands pressing & lightly kneading it together until you have a moist ball of dough that holds together well.
Place the dough on a well-floured surface.
Flour your rolling pin & start working from the center pushing outward in all directions.
Once you have stretched the dough large enough to fill your pie plate carefully transfer it to your plate.
Trim any excess dough that hangs over the edge of the pie plate.
Flute your edges by crimping between your fingers and pinching the dough every ½ inch or so.
If you are baking this pie & filling it afterward – Poke holes in the bottom of the crust with a fork. Bake at 425 degrees for a conventional/ 400 degrees for convection for approximately 15 minutes. In our case, it would be best to bake it for 10 to 12 minutes. Start baking for 7 minutes in the oven first. Then cover using aluminum foil and watch your crust carefully for the next 3-5 minutes or so. Just to ensure there isn't too much browning or a burnt crust.
Baking time is just for the crust. If you are filling the pie before baking – do not poke holes in the crust.
Baking times for a filled pie will vary depending on the filling you are baking.
Notes
*Recipe is for 1 bottom crust. You can easily double this for a top & bottom or continue doubling for the number of pies you are making.
If you choose to use the ingredients list below instead, then follow all steps listed above exactly as best you can for the crust instructions.
Once you have baked your pie crust(s) and prepared your Chocolate Cream filling it is now time to assemble! To put this lovely tasty dish together all you need to do is grab your pie crust(s) and your filling. Place the crust(s) on a sturdy plate or in a container, wherever you're wanting them to go. Add your chocolate cream filling to your crust(s) and then you're done! At this point, if you are feeling ambitious or creative, you can top with fruit, or whipped cream, or whipped cream alternative. For fruit, mixed or any berry would work well here. You could even add a dusting of Cacao or Cocoa powder. Your topping options are endless if you want to pursue that!
I hope you enjoyed this post and found it useful or inspiring! I have added a video of what the filling should look like mixed below. Along with a picture of what the dough should look like, and what yogurt and cacao powder I used! I would highly encourage you to give this a try and let me know what you think if you do try it! I will see you again very soon! I am sending love and hugs to you as you read this!
Best wishes,
The Inspiring Hummingbird!
The Original ingredients for the original pie crust recipe are,
Ingredients
1 1/4 cups all-purpose flour
1/4 teaspoon salt
1/2 teaspoon granulated sugar
1/2 cup cold butter (1 stick cut into cubes)
1/4 cup ice water


Comments